
If you’re a horse owner or enthusiast, knowing how to tie rope halters is an essential skill. Rope halters are versatile, durable, and provide gentle yet effective control over your horse. Whether you’re looking to train, lead, or handle your horse safely, a well-tied rope halter is a must-have. In this guide, we’ll walk you through the step-by-step process of tying a rope halter for horses, ensuring a secure fit and optimal comfort for your equine partner. Let’s dive in!

Benefits of Using Rope Halters for Horse Training
Horse training is an essential aspect of ensuring the safety and well-being of both the horse and the rider. There are various tools available to trainers, and one such tool that has gained popularity in recent years is the rope halter. Rope halters are different from traditional leather or nylon halters in their design and functionality. They offer several benefits that make them a preferred choice for horse training. In this section, we will explore the advantages of using rope halters for horse training.
1. Enhanced Communication
One of the significant benefits of using rope halters is that they provide enhanced communication between the horse and the trainer. The design of the rope halter allows for precise pressure and release, enabling clearer cues to be given to the horse. The ropes used in rope halters are thinner and lighter, allowing for more subtle signals to be transmitted. This level of communication is crucial for teaching the horse specific commands and maneuvers.
2. Increased Control
Rope halters offer greater control over the horse compared to traditional halters. The knots and pressure points on a rope halter are strategically placed to exert pressure in specific areas, such as the nose and poll. This gives the trainer more control over the horse’s movements and behavior. With proper training and handling, rope halters can aid in teaching the horse to respond to light and subtle cues, ultimately improving their responsiveness and obedience.
3. Gentle and Effective Training
Rope halters are known for their gentle yet effective training methods. The pressure applied by the halter is distributed evenly across the horse’s head, avoiding any single point of discomfort or pain. This makes rope halters a humane and ethical choice for horse training. The use of a rope halter encourages the horse to respond to lighter pressure, promoting a lighter and more responsive mindset.
4. Versatility
Rope halters are incredibly versatile and can be used for various training purposes. They can be used in groundwork exercises, lunging, leading, and even under saddle. The versatility of rope halters makes them a valuable tool for trainers working with horses at different stages of training. Additionally, rope halters are adjustable and can be customized to fit horses of different sizes and breeds.
5. Durability
Another advantage of rope halters is their durability. Rope halters are typically made from high-quality, rot-resistant materials, making them long-lasting and suitable for regular use. Compared to traditional halters, rope halters are less likely to break or become damaged, ensuring that they withstand the rigors of horse training.
6. Safety
Rope halters offer added safety features for both the horse and the trainer. The design of the rope halter allows for quick and easy release in emergency situations, reducing the risk of injury to both parties. The combination of control, communication, and safety makes rope halters an excellent choice for trainers looking to prioritize the well-being of their horses.
In Summary
Rope halters provide numerous benefits for horse training. They enhance communication between the horse and the trainer, offer increased control, and promote gentle and effective training methods. The versatility and durability of rope halters make them suitable for various training activities, while their safety features prioritize the well-being of both the horse and the trainer. Overall, rope halters are a valuable tool in the trainer’s arsenal and can greatly contribute to the success of horse training endeavors.
Step-by-step Guide: Tying a Basic Rope Halter for Horses
Having a well-fitted and properly tied halter for your horse is crucial for their safety and your control. While there are various types of halters available, a basic rope halter is a versatile and popular choice among horse owners. In this section, we will provide you with a step-by-step guide on tying a basic rope halter for horses.
Materials Needed:
- 10-12 foot length of rope (preferably a soft, 1/4 inch diameter rope)
- Scissors
Step 1: Preparing the Rope
Start by cutting a 10-12 foot length of rope. Ensure that the rope is soft and of appropriate diameter (around 1/4 inch) to prevent any discomfort or injury to the horse.
Step 2: Forming the Noseband
Hold the rope in both hands, keeping the center of the rope at the horse’s nose level. Cross the right side of the rope over the left side, forming an “X.” The right side of the rope should now be on the left, and the left side should be on the right.
Step 3: Creating the Overhand Knot
With the crossed rope in place, take the right side of the rope and thread it up through the bottom of the X-shape. Bring the right side of the rope over the top of the left side, creating a loop with the right side passing over the left side.
Next, take the left side of the rope and thread it under the right side of the loop, passing it through the loop from back to front. Gently tighten the knot by pulling both ends of the rope simultaneously. This forms the noseband of the rope halter.
Step 4: Creating the Cheekpieces
To create the cheekpieces, take the left side of the rope (forming the loop) and double it back, creating a smaller loop about 6 inches long. Hold the smaller loop in your right hand.
Next, take the right side of the rope (the longer side) and thread it through the smaller loop from the front to the back. Pull the right side of the rope snugly to form the first cheekpiece. Repeat this process on the opposite side to create the second cheekpiece.
Step 5: Adjusting the Fit
Once the basic rope halter is tied, it’s important to adjust the fit to ensure it is snug but not tight. The noseband should sit just above the horse’s nostrils, and the cheekpieces should be positioned at the cheekbones.
Check for any discomfort or pressure points on the horse’s face and make any necessary adjustments. It’s crucial to ensure that the halter is secure and properly fitted to prevent any accidents or injuries.
Step 6: Safety Considerations
Always prioritize safety when using any type of halter on your horse. Regularly inspect the rope halter for signs of wear and tear, and replace it if necessary. Ensure that the knots are secure, and the halter is correctly fitted before handling or tying your horse.
Remember to never leave your horse unattended while wearing a rope halter, as they can easily catch on objects and cause injury.
Summary
A basic rope halter is a versatile and practical tool for handling and controlling horses. By following this step-by-step guide, you can confidently tie a basic rope halter for your horse. Remember to prioritize safety, regularly inspect the halter, and ensure a proper fit to keep your horse comfortable and secure.

Tips for Proper Fitting and Adjustment of Rope Halters for Horses
When it comes to handling and training horses, a well-fitted halter is essential. A rope halter is a popular choice among horse owners due to its versatility and effectiveness. However, to ensure maximum comfort and control, it is important to properly fit and adjust the rope halter. Here are some valuable tips to help you achieve the perfect fit for your horse.
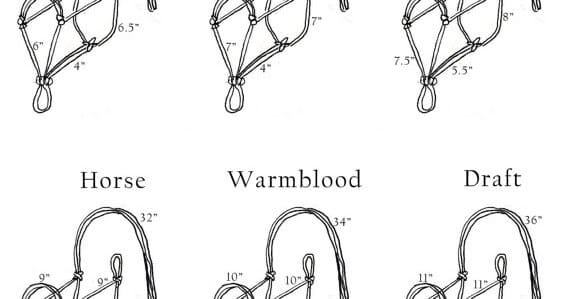
1. Choose the Right Size
Before fitting a rope halter, make sure you have the correct size for your horse. Rope halters are available in various sizes, so it’s important to measure your horse’s head accurately. Measure the circumference of your horse’s nose just below the cheekbone and around the poll. This will help you determine the appropriate size for your horse.
2. Adjust the Crownpiece
Start by adjusting the crownpiece, which goes behind the ears and over the poll. The crownpiece should sit comfortably without causing any tightness or pressure. It should be snug but not too tight. A loose crownpiece can lead to the halter slipping off, while a tight crownpiece can cause discomfort and restrict movement.
3. Fit the Noseband
Next, adjust the noseband of the halter. The noseband should sit about two finger-widths below the cheekbone. It should be snug but not overly tight, allowing enough room for your horse to chew and breathe comfortably. Avoid leaving excessive slack in the noseband, as this can lead to loss of control.
4. Position the Throatlatch
The throatlatch is the strap that goes under the horse’s throat. It should be adjusted to provide a snug fit, preventing the halter from slipping off. However, make sure it is not too tight, as it can restrict the horse’s movement and cause discomfort. You should be able to fit two fingers comfortably between the throatlatch and your horse’s throat.
5. Check for Proper Alignment
Once the halter is adjusted, take a step back and ensure that all the parts are aligned correctly. The noseband should be centered and sit flat against the horse’s face, without any twisting or tilting. The crownpiece should be level and straight, without causing any pressure points or rubbing. The throatlatch should not interfere with the horse’s breathing or movement.
6. Regularly Check and Adjust
Properly fitting a rope halter is not a one-time task. Horses grow, and halters may stretch or become loose over time. Therefore, it is important to regularly check and adjust the halter’s fit. Inspect the halter for any signs of wear and tear, and make necessary adjustments to maintain a comfortable and secure fit.
In summary, fitting and adjusting a rope halter for your horse is crucial for both safety and comfort. Take the time to measure and choose the correct size, and carefully adjust the crownpiece, noseband, and throatlatch. Regularly check and make adjustments as needed to ensure a proper fit. By following these tips, you can ensure that your horse is comfortable, and you have optimal control during training and handling.
Common Mistakes to Avoid When Tying Rope Halters for Horses
Using a rope halter is essential in horse training and handling. It provides better control and communication with your horse compared to a regular halter. However, it is important to tie the rope halter correctly to ensure your horse’s safety and comfort. Avoiding common mistakes when tying rope halters is crucial for effective communication and preventing any potential harm to your horse. Let’s explore some of the common mistakes to avoid when tying rope halters for horses.
1. Incorrect Placement
One of the most common mistakes horse owners make when tying rope halters is placing the halter too high or too low on the horse’s head. The rope halter should sit snugly and comfortably above the horse’s nose and below the cheekbones. Placing it too high or too low can cause discomfort and restrict proper communication between you and your horse.
2. Incorrect Tying Technique
The way you tie the rope halter is essential for maintaining a secure fit without causing unnecessary pressure points. Avoid tying the rope halter too tight, as it can create discomfort and potentially harm the horse. On the other hand, tying it too loose may result in the halter slipping or becoming ineffective. Ensure that the knots are secure but not overly tight, allowing your horse to move and breathe comfortably.
3. Poor Knot Choice
Choosing the wrong type of knot when tying a rope halter can lead to unintended consequences. It is important to use a knot that is secure and easily adjustable. The most common knot used for tying rope halters is the fiador knot. This knot provides a secure fit while allowing adjustments when needed. Avoid using complicated or unreliable knots that may come undone, jeopardizing your horse’s safety.
4. Incorrect Rein Length
Another common mistake is using an incorrect rein length when attaching the lead rope to the rope halter. The reins should be an appropriate length to maintain a safe distance between you and your horse while maintaining effective communication. If the reins are too long, you may have less control, while short reins may cause discomfort or restrict movement. Find a balance that suits both you and your horse’s needs.
5. Lack of Regular Inspections
Regularly inspecting your horse’s rope halter is crucial for identifying any signs of wear and tear. Over time, the rope may become frayed or damaged, compromising its effectiveness and safety. It is important to replace the rope halter if any signs of damage are found. Additionally, ensuring the halter is clean and free from dirt or debris helps maintain its durability and comfort.
6. Insufficient Training
Lastly, one of the most significant mistakes is not providing proper training to your horse when introducing a rope halter. Transitioning from a regular halter to a rope halter requires patience and gradual acclimation. Take the time to familiarize your horse with the new halter and gradually introduce the pressure signals associated with it. Adequate training will help your horse understand and respond correctly to the rope halter cues.
In summary, to effectively use a rope halter for your horse, it is important to avoid common mistakes such as incorrect placement, improper tying techniques, using the wrong knot, using incorrect rein length, neglecting regular inspections, and insufficient training. By avoiding these mistakes and practicing proper rope halter techniques, you can ensure clear communication, comfort, and safety for both you and your horse.
FAQs
1. How do I tie a rope halter for horses?
To tie a rope halter for horses, start by holding the halter with the lead rope attached. Place the noseband over the horse’s nose, position the cheekpieces behind the ears, and bring the throatlatch strap under the jaw. Next, tie the throatlatch strap securely behind the jaw using a square knot. Adjust the fit as needed, ensuring it is snug but still allows proper movement and doesn’t cause discomfort.
2. What type of rope should I use for making a horse halter?
When making a horse halter, it is important to use a high-quality rope that is durable and comfortable for the horse. Ideally, you should use a soft rope made specifically for halters, such as nylon or polyester. Avoid using ropes with rough or abrasive surfaces that could cause irritation or discomfort to the horse.
3. Can I use a rope halter for all horse activities?
Rope halters can be used for many horse activities, including groundwork, trail riding, and basic handling. However, they may not be suitable for high-intensity activities such as jumping or heavy pulling. In those cases, it is recommended to use a specialized halter designed for the specific activity to ensure the horse’s safety and comfort.
Conclusion
In conclusion, learning how to tie rope halters for horses is a valuable skill for any horse owner or enthusiast. By utilizing this versatile and secure method, you can confidently and comfortably lead and handle your horse. Whether you are training, riding, or simply spending time with your equine companion, a properly tied rope halter provides effective communication and control.
Remember, practice makes perfect when it comes to tying rope halters. Take the time to familiarize yourself with the different knots and techniques involved, and always prioritize the comfort and safety of your horse. With patience and dedication, you will soon become proficient in tying rope halters, enhancing your horsemanship skills and strengthening the bond between you and your horse.