
Learning how to tie a rope horse halter is an essential skill for any equestrian enthusiast. Whether you’re a beginner or an experienced rider, a halter is a fundamental piece of equipment that helps you safely and effectively handle your horse. By following a few simple steps and techniques, you can quickly and securely tie a rope horse halter, providing comfort and control for your equine partner. In this guide, we will walk you through the process of tying a rope horse halter, ensuring the safety and happiness of both you and your horse.
Step-by-Step Guide to Tying a Rope Halter for Your Horse
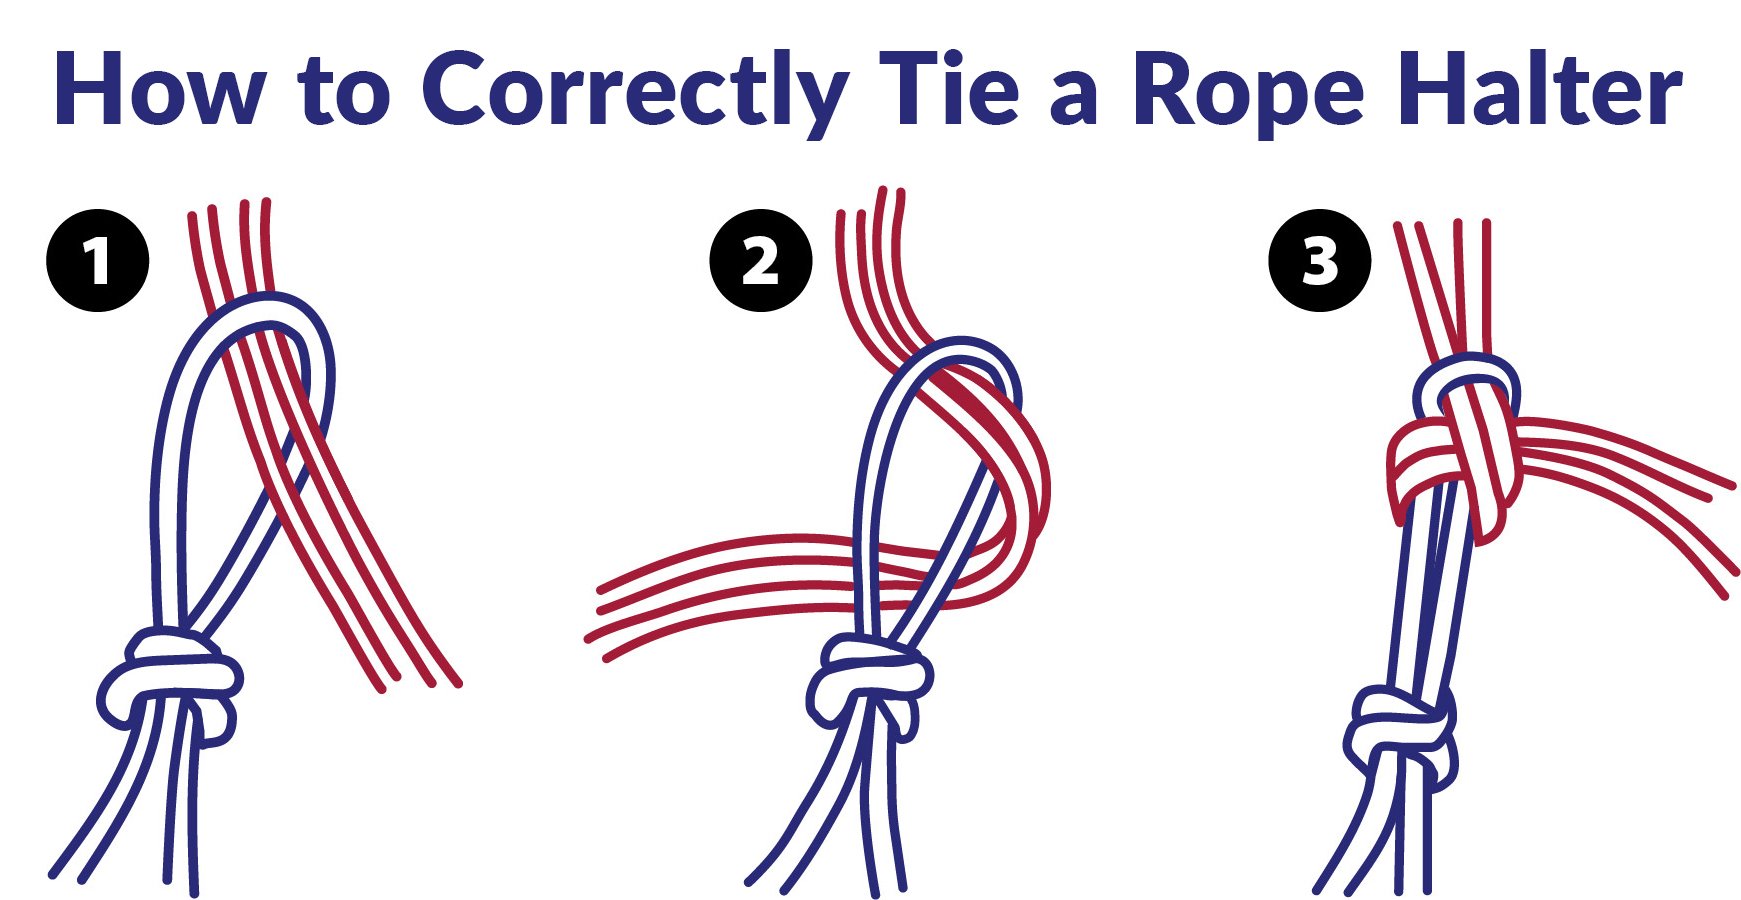
Tying a rope halter for your horse is an essential skill for any horse owner or handler. A rope halter provides a secure and comfortable way to lead and control your horse. It is also easy to adjust and can be customized to fit your horse perfectly. In this section, we will provide you with a step-by-step guide on how to tie a rope halter for your horse.
Step 1: Choose the Right Rope
The first step in tying a rope halter is to choose the right rope. You will want to select a sturdy rope that is soft and comfortable for your horse. Avoid ropes that are too stiff or rough, as they can cause discomfort or irritation to your horse’s skin.
Step 2: Measure the Rope
Once you have chosen the right rope, you will need to measure it to the correct length. Start by measuring the distance from your horse’s poll to the point just under its cheekbones. This will be the length of the rope you will need to tie your halter.
Step 3: Create a Loop
To begin tying the rope halter, create a loop at one end of the rope. This loop will serve as the foundation of your halter. Make sure the loop is large enough to fit over your horse’s nose comfortably.
Step 4: Make a Figure Eight
Next, take the long end of the rope and pass it through the loop you created in step 3. Cross the long end over the loop, creating a figure-eight shape.
Step 5: Create a Second Loop
Now, create a second loop near the figure-eight shape you just made. This loop should be smaller in size and will serve as the throatlatch of the halter.
Step 6: Thread the Long End
Take the long end of the rope and thread it through the second loop you created. Pull the end of the rope through, making sure it is snug but not too tight.
Step 7: Adjust the Halter
Once you have threaded the long end through the second loop, you can now adjust the fit of the halter. Gently pull on the long end of the rope to tighten the halter around your horse’s nose and throat. Make sure it is snug but not causing any discomfort.
Step 8: Secure the Halter
Finally, secure the halter by tying a simple knot or using a quick-release knot. This will keep the halter in place and prevent it from coming undone during use.
And there you have it! You have successfully tied a rope halter for your horse. Remember to always check the fit of the halter before using it and make any necessary adjustments for your horse’s comfort. By following this step-by-step guide, you can ensure a safe and secure halter for your horse.

Tips and Tricks for Properly Adjusting a Horse Halter
When it comes to horse handling and safety, one of the most important equipment is the horse halter. A properly fitting halter ensures the comfort and control of the horse during handling, grooming, and leading. Here are some tips and tricks to help you adjust a horse halter correctly:
1. Choose the Right Size Halter
The first step in adjusting a horse halter is to ensure that you have the right size. Halters come in different sizes, such as small, medium, large, and extra-large. It is essential to select the appropriate size that fits your horse’s head comfortably without being too loose or too tight.
2. Check the Fit
Before adjusting the halter, check the overall fit. The noseband should sit comfortably on the horse’s nose, approximately two inches below the cheekbone. The throat latch should fasten easily, allowing enough room for the horse to move its head without restriction. Ensure that the cheekpieces are properly aligned with the horse’s eyes and don’t rub against them.
3. Adjust the Crownpiece
Start adjusting the halter by loosening the crownpiece enough to fit over the horse’s ears. Once the halter is in place, tighten the crownpiece to ensure a secure fit without digging into the horse’s poll. It should be snug enough to stay in place but not too tight as to cause discomfort or restrict movement.
4. Properly Fit the Noseband
Next, adjust the noseband so that it sits snugly but comfortably around the horse’s nose. Avoid making it too tight as it can impede the horse’s breathing. The noseband should be loose enough to allow the horse to eat, drink, and breathe comfortably, but not so loose that the horse can easily slip it off.
5. Fasten the Throat Latch
The throat latch should be fastened securely but with enough room for the horse to move its head without restriction. Ensure that you can comfortably fit two or three fingers between the throat latch and the horse’s throat. This allows for proper blood circulation and prevents discomfort.
6. Regularly Check and Adjust
It’s crucial to regularly check the fit of the horse halter and make any necessary adjustments. Horses’ sizes can change due to weight gain or loss, so it’s essential to ensure that the halter always fits properly. Regularly inspect the halter for any signs of wear and tear and replace it if necessary.
7. Seek Professional Guidance
If you are unsure about adjusting a horse halter correctly, it’s wise to seek professional guidance. Trainers, experienced horse handlers, or equine professionals can provide valuable advice and demonstrate the proper way to adjust a halter for your specific horse.
In summary, a properly adjusted horse halter is crucial for the comfort and safety of the horse. Always choose the right size halter and ensure that the noseband, crownpiece, and throat latch are adjusted correctly. Regularly check the fit and seek professional guidance if needed. By following these tips and tricks, you can ensure that your horse is comfortable and secure while wearing a halter.
Alternative Uses for Rope Horse Halters: Beyond Tying and Leading
Rope horse halters are versatile tools that have been traditionally used for tying and leading horses. However, they have many alternative uses that go beyond their conventional purpose. In this section, we will explore some of the creative ways in which rope horse halters can be utilized.
Training and Groundwork
Rope horse halters are popular among trainers and horse owners for various training techniques and groundwork exercises. The sturdy construction of rope halters provides better control and communication between the handler and the horse.
One common training method is called “join-up,” where the horse is taught to follow the handler’s body language and cues. The rope halter allows the handler to effectively communicate with the horse and establish a connection based on trust and respect.
Additionally, rope halters are used in ground tying exercises, where the horse is trained to stay in a specific spot without being physically tied. This exercise helps improve the horse’s focus, patience, and overall obedience.
Trail Riding and Hiking
Rope halters can be a valuable tool for trail riding and hiking enthusiasts. They offer a lightweight and compact alternative to traditional bridles, making them perfect for outdoor adventures.
When riding on the trail, a rope halter can be used to secure a horse to a hitching post or tree for a short period. This allows riders to take a break, have a snack, or attend to other necessities without worrying about their horse wandering off.
Furthermore, rope halters can serve as emergency halters during hiking trips. In case of unforeseen circumstances such as a bridle breaking, a rope halter can be quickly improvised to lead or tie the horse temporarily until a proper replacement is available.
Problem Solving and Safety
Rope halters can be valuable tools in problem-solving situations and safety precautions. They provide increased control and minimize the risk of injury for both the handler and the horse.
For instance, if a horse tends to pull back or bolt while tied, a rope halter with additional knots can be used to create a “pressure release” system. This setup allows the horse to feel discomfort when pulling back but releases the pressure as soon as they move forward, discouraging the undesirable behavior.
Rope halters also offer a safer option for trailer tying. The sturdy construction and secure fit help prevent the horse from slipping or getting loose during transportation.
Equine Therapy and Rehabilitation
Rope halters are widely used in equine therapy and rehabilitation programs. The gentle yet effective pressure applied by the halter can aid in relaxation, body awareness, and overall well-being of the horse.
Equine therapists often utilize rope halters during activities such as leading, lunging, and ground exercises to help horses develop balance, coordination, and muscle strength. The halter’s design allows for precise communication and encourages the horse to engage with the therapy process.
In summary, while rope horse halters are primarily known for tying and leading, they possess a wide range of alternative uses. From training and groundwork to trail riding and problem-solving, these versatile tools can greatly benefit both horses and their handlers in various situations. So, next time you reach for your rope horse halter, consider exploring its potential beyond the conventional applications.
Common Mistakes to Avoid when Tying a Rope Horse Halter
When it comes to tying a rope horse halter, there are certain mistakes that many people make unknowingly. These mistakes can compromise the safety and effectiveness of the halter, putting both the horse and the handler at risk. In this section, we will discuss some common mistakes to avoid when tying a rope horse halter, ensuring the well-being of your horse and promoting a successful training experience.
1. Using an Incorrect Rope Length
One common mistake is using a rope that is either too long or too short for the horse’s size and build. The rope should be long enough to comfortably tie the halter, but not so long that it drags on the ground or becomes tangled. On the other hand, a rope that is too short can create pressure points on the horse’s sensitive areas, causing discomfort or even injury.
To determine the appropriate rope length, measure from the base of the horse’s ear to the point where the halter should sit on its nose. Add a few inches for knot tying and adjust the length accordingly for a proper fit.
2. Incorrect Placement of the Halter
Another mistake is placing the halter too low or too high on the horse’s head. When the halter is too low, it can interfere with the horse’s ability to breathe properly or chew comfortably. On the other hand, if the halter is positioned too high, it may put pressure on the sensitive facial nerves, causing discomfort or even pain.
Ensure that the halter is placed on the horse’s head in such a way that it sits comfortably on the bridge of the nose, just below the cheekbones. This allows for proper airflow and ensures the halter’s effectiveness during training.
3. Improper Knot Tying
Tying the knot incorrectly is another mistake to avoid. The knot should be secure enough to hold the halter in place, but not so tight that it causes discomfort or restricts the horse’s movements. A loose knot, on the other hand, may come undone easily, compromising the effectiveness of the halter.
One commonly used knot for tying a rope horse halter is the square knot or the figure-eight knot. These knots provide a secure and adjustable fit, ensuring the halter stays in place without causing discomfort to the horse.
4. Neglecting Regular Inspection
Regular inspection of the rope horse halter is essential to ensure its integrity and functionality. Neglecting this step can lead to the use of a faulty or damaged halter, putting both the horse and the handler at risk. Be sure to check for any fraying, wear and tear, or weak points in the rope, and replace the halter if necessary.
Additionally, inspect the knots regularly to ensure they are secure and properly tied. This will prevent any accidents or unintended release of the halter during training sessions.
5. Rushing the Process
One of the biggest mistakes horse owners make when tying a rope horse halter is rushing the process. It is important to take the time to properly adjust the halter, tie the knots securely, and ensure the horse is comfortable and at ease. Rushing through the process can lead to mistakes and compromise the safety and effectiveness of the halter.
Take the time to understand the correct techniques for tying a rope horse halter and practice them until you are confident in your skills. This will ensure a safe and successful training experience for both you and your horse.
In summary, when tying a rope horse halter, it is important to avoid common mistakes to ensure the safety and effectiveness of the halter. By using the correct rope length, placing the halter properly on the horse’s head, tying the knot correctly, regularly inspecting the halter, and taking your time during the process, you can mitigate any potential risks and create a positive training experience for your horse.
FAQs
1. How to tie a rope horse halter?
To tie a rope horse halter, start by placing the halter over your horse’s nose, making sure it sits comfortably. Then, bring the left end of the rope over the horse’s neck and through the loop, creating a slip knot. Repeat this on the right side. Finally, adjust the fit by tightening or loosening the slip knots as needed.
2. What is a rope horse halter?
A rope horse halter is a type of halter made from sturdy rope material. It is designed to provide control and guidance when handling or leading a horse. The rope halter distributes pressure evenly, making it an effective and versatile tool.
3. Why use a rope horse halter?
A rope horse halter offers several benefits, including better communication and control. The firm yet gentle pressure exerted by the rope halter helps teach a horse to respond to commands more effectively. Additionally, the durable construction of a rope halter ensures longevity and reliability in various training situations.
Conclusion
In conclusion, learning how to tie a rope horse halter is an essential skill for any horse owner or rider. By following the step-by-step instructions and practicing with patience, you can easily master the art of tying a secure and reliable horse halter. Not only will this knowledge help you ensure the safety and comfort of your horse, but it will also strengthen the bond between you and your equine companion. So, don’t hesitate to invest some time and effort into mastering this valuable skill. Your horse will thank you for it!
In summary, tying a rope horse halter requires attention to detail and proper technique. Remember to always use a high-quality and durable rope that won’t cause any discomfort or harm to your horse. By tying the halter correctly, you can ensure that the pressure is evenly distributed and your horse remains comfortable and secure. Practice regularly to improve your skills and become confident in your ability to tie a rope horse halter. With patience and practice, you will become proficient in this important aspect of horse care and handling.