
If you’re a horse owner or handler, knowing how to tie a horse halter is an essential skill. Whether you’re preparing for a ride, grooming your horse, or just need to secure them temporarily, a properly tied halter is crucial. In this guide, we’ll walk you through the step-by-step process of tying a horse halter, from selecting the right type of halter to securely fastening it onto your horse. With these simple instructions, you’ll be able to confidently and safely handle your horse with ease.
Step-by-Step Guide to Tying a Horse Halter
Being able to properly tie a horse halter is an essential skill for any horse owner or handler. A halter is a piece of equipment that is used to control and lead a horse. It is important to know how to tie a horse halter correctly to ensure the safety and comfort of the horse. In this section, we will provide you with a step-by-step guide on how to tie a horse halter.
Step 1: Position the Halter
Start by positioning the halter correctly. Hold the halter with the noseband facing you and the crownpiece facing away from you. The noseband should be on top, and the lead rope should hang down from the bottom of the halter.
Step 2: Approach the Horse
Approach the horse calmly and confidently. It is important to approach the horse from the side, rather than directly in front of or behind the horse. This will help to prevent spooking or startling the horse.
Step 3: Prepare the Horse
Before attempting to tie the halter, it is important to ensure that the horse is calm and relaxed. Spend a few moments grooming or petting the horse to help them feel comfortable and trust you.
Step 4: Place the Halter on the Horse
Place the halter over the horse’s nose and slide it up towards the ears. The noseband should rest comfortably on the bridge of the horse’s nose, and the crownpiece should sit just behind the ears. Adjust the fit of the halter by using the buckles or fasteners on the sides of the halter. The halter should fit snugly but not tight.
Step 5: Fasten the Halter
Once the halter is correctly positioned on the horse, fasten the buckles or fasteners on the sides of the halter. Ensure that the halter is securely fastened, but not too tight. You should be able to fit two fingers comfortably between the halter and the horse’s skin.
Step 6: Attach the Lead Rope
Attach the lead rope to the bottom of the halter. Most halters have a metal ring or clip at the bottom where the lead rope can be attached. Make sure that the lead rope is securely attached and will not come loose during handling.
Step 7: Lead the Horse
Once the halter and lead rope are securely attached, you can lead the horse by gently pulling on the lead rope and guiding the horse in the direction you want them to go. Remember to always walk on the left side of the horse, with the lead rope held in your right hand.
In summary, tying a horse halter correctly is an important skill for any horse owner or handler. By following these step-by-step instructions, you can ensure that the halter is securely fastened and comfortable for the horse. Remember to always approach the horse calmly and confidently and to take the time to build a trusting relationship with the horse.

Different Types of Horse Halters and Their Uses
When it comes to handling and controlling horses, halters play a crucial role. Halters are essential tools in equestrian activities, used for leading, tying, grooming, and training horses. They come in various styles and designs, each serving different purposes. In this section, we will explore the different types of horse halters and their specific uses.
1. Breakaway Halter
The breakaway halter is designed with safety in mind. It has a special release mechanism that allows the halter to break apart under extreme pressure or if the horse gets caught on something. This type of halter is commonly used when turning out horses or in situations where the horse may be at risk of getting tangled or trapped.
2. Flat Halter
Also known as a nylon halter, the flat halter is one of the most commonly used types. It features a simple design with a flat band that goes around the horse’s head and a buckle or snap closure. Flat halters are versatile and can be used for everyday handling, grooming, and leading.
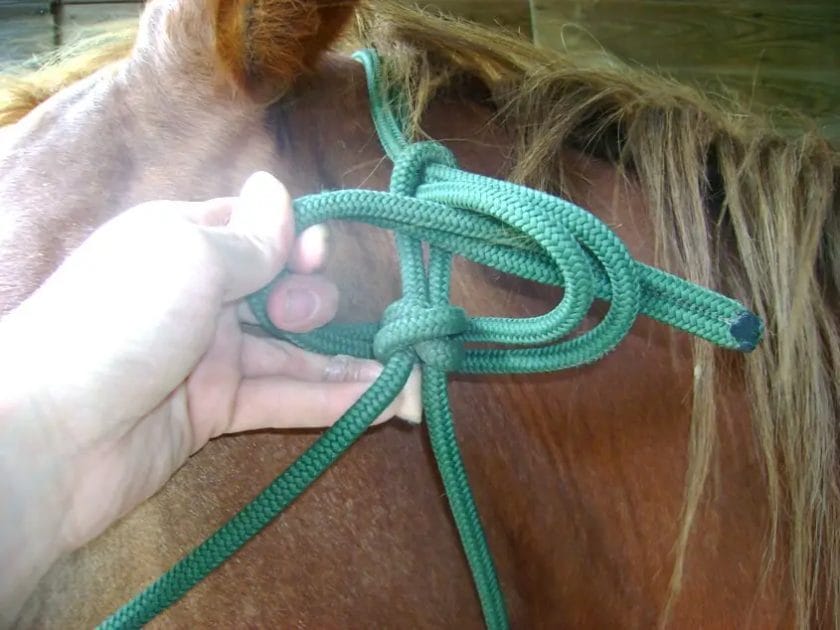
3. Rope Halter
A rope halter is made of sturdy ropes or cords that are knotted together to form the headstall and noseband. This type of halter is popular among natural horsemanship enthusiasts and trainers. Rope halters provide more control over the horse and are commonly used for groundwork and training exercises.
4. Leather Halter
Leather halters are considered more luxurious and are often used for show horses or special occasions. They are made from high-quality leather and feature a padded noseband and headstall for added comfort. Leather halters are commonly seen in the show ring and are not recommended for everyday use as they require more maintenance.
5. Show Halter
Show halters are specifically designed to enhance the horse’s appearance during competitions and shows. They are often made of high-quality materials such as leather or fancy, embellished nylon. Show halters are more ornate and feature decorative hardware or stitching to make the horse stand out in the ring.
6. Foal Halter
As the name suggests, foal halters are designed for young horses, specifically foals. They are smaller in size to properly fit a foal’s delicate head and are adjustable to accommodate the rapid growth of the young horse. Foal halters are essential for leading, training, and handling young horses.
7. Grazing Halter
Grazing halters are designed for horses that spend extended periods of time grazing. They typically have a built-in muzzle or grazing attachment that limits the amount of grass the horse can consume. Grazing halters are commonly used for horses prone to overgrazing or those on restricted diets.
8. Racing Halter
Racing halters are specifically designed for racehorses. They are lightweight, minimalistic, and often made of synthetic materials. Racing halters are designed to minimize interference and maximize speed during races.
In summary, horse halters come in various types to cater to different needs and situations. Whether you are handling a young foal, training a horse, or preparing for a show, choosing the right halter is crucial. Understanding the purpose and functionality of each type of halter will help you make an informed decision and ensure the safety and comfort of your horse.
Common Mistakes to Avoid When Tying a Horse Halter
Horse halters are an essential piece of equipment for anyone who owns or works with horses. They are used to safely control and lead horses, making them an important tool in handling and training horses. While tying a horse halter may seem like a simple task, there are several common mistakes that should be avoided to ensure the safety and well-being of both the horse and the handler.
1. Incorrect Knots
One of the most common mistakes when tying a horse halter is using incorrect knots. Tying a secure and properly functioning knot is crucial to ensure that the halter stays in place and does not become loose or undone while handling the horse. It is important to learn and use the correct knot for tying a horse halter, such as the square knot or the quick-release knot. These knots provide security and can be easily undone when necessary.
2. Improper Adjustment
Another common mistake is improper adjustment of the horse halter. The halter should be adjusted to fit the horse’s head properly, neither too loose nor too tight. A halter that is too loose can easily slip off, while a halter that is too tight can cause discomfort or even injury to the horse. It is important to take the time to adjust the halter properly to ensure a secure and comfortable fit.
3. Using the Wrong Size
Using the wrong size of horse halter is another mistake to avoid. Halters come in different sizes to fit horses of different breeds, ages, and head shapes. Using a halter that is too small or too large for the horse can lead to discomfort and difficulty in properly controlling the horse. It is important to choose a halter that fits the horse properly to ensure safety and effectiveness.
4. Leaving the Horse Unattended
Leaving a horse unattended while tied in a halter is a dangerous mistake that should always be avoided. Horses can be unpredictable and may panic or become frightened while tied, potentially leading to injuries or escape. It is important to always supervise a tied horse and never leave them unattended, even for a short period of time.
5. Tying to an Unsafe Object
Tying a horse halter to an unsafe object is another common mistake that can have serious consequences. It is essential to always tie the horse to a sturdy and secure object, such as a hitching post or a solid fence rail. Tying to objects that are not designed to hold the weight and strength of a horse can result in the horse breaking free or causing damage to the surroundings.
6. Incorrect Placement of the Tie
The placement of the tie while tying a horse halter is another aspect that should be given careful consideration. The tie should be positioned at a height that allows the horse to move its head comfortably but prevents it from getting tangled or caught. Placing the tie too high or too low can create unnecessary risks and restrict the horse’s movements.
7. Rushing the Process
Lastly, rushing the process of tying a horse halter is a mistake that can result in an insecure or poorly tied halter. Taking the time to properly tie and adjust the halter, ensuring that all knots are secure and that the fit is correct, is essential for the safety and well-being of both the horse and the handler. Rushing through the process can lead to preventable accidents or incidents.
In summary, when tying a horse halter, it is important to avoid common mistakes such as using incorrect knots, improper adjustment, using the wrong size, leaving the horse unattended, tying to an unsafe object, incorrect placement of the tie, and rushing the process. By being mindful of these mistakes and taking the necessary precautions, you can ensure the safety and comfort of both you and your horse during haltering and handling.
Tips for Proper Maintenance and Care of Horse Halters
Proper maintenance and care of horse halters are essential to ensure the safety and durability of these important pieces of equipment. By following a few simple tips, you can keep your horse halters in excellent condition and prolong their lifespan. Here are some useful guidelines to help you take care of your horse halters:
1. Regular Cleaning
Cleaning your horse halters on a regular basis is vital to remove dirt, sweat, and grime that can accumulate over time. Start by removing any dirt or debris from the halter using a brush or a soft cloth. Then, fill a bucket with warm water and add a mild horse-safe detergent. Dip the halter into the soapy water and gently scrub it with a soft brush to remove any stubborn stains. Rinse the halter thoroughly to remove all traces of soap and hang it to dry in a well-ventilated area.
2. Inspect for Wear and Tear
Regularly inspect your horse halters for any signs of wear and tear. Check for frayed or loose stitching, broken buckles, or any other damage that may compromise the halter’s functionality. If you notice any issues, it’s important to repair or replace the halter before using it on your horse. Continuing to use a damaged halter can pose a safety risk to both you and your horse.
3. Avoid Excessive Exposure to Sunlight
Excessive exposure to sunlight can cause the material of the halter to fade and weaken over time. To prevent this, avoid leaving your horse halters exposed to direct sunlight for extended periods. When not in use, store them in a cool, dry place away from direct sunlight. If possible, consider using a halter cover or a storage bag to provide additional protection.
4. Proper Storage
Proper storage is key to maintaining the quality of your horse halters. Make sure to store them in a clean and dry environment to prevent mold and mildew growth. Avoid storing halters in damp areas or places where they can get tangled or damaged. Hanging them on halter hooks or placing them in a dedicated halter storage bag can help keep them organized and in good condition.
5. Regular Adjustment
Regularly check the fit of your horse halters and adjust them accordingly. Halters that are too loose can be easily slipped off by your horse, while those that are too tight can cause discomfort and restrict breathing. Ensure that the halter fits comfortably around your horse’s head, with enough room for movement and proper circulation.
6. Keep Halters Away from Other Horses
When not in use, it’s important to keep your horse halters away from other horses to prevent them from being chewed, stepped on, or tangled. Horses have a tendency to be curious and playful, and they may damage or destroy a halter if given the opportunity. Keep halters stored securely to avoid any unnecessary accidents or damage.
In summary, proper maintenance and care of horse halters are essential to ensure their longevity and functionality. Regular cleaning, inspection for wear and tear, avoiding excessive sunlight exposure, proper storage, regular adjustment, and keeping halters away from other horses are key tips to follow. By taking good care of your horse halters, you can ensure the safety and comfort of your horse, and extend the lifespan of these important pieces of equipment.
FAQs
How to tie a horse halter?
To tie a horse halter, start by placing the halter over the horse’s nose, ensuring that it fits comfortably. Then, bring the left strap behind the horse’s head and attach it to the buckle on the right side. Next, bring the right strap behind the horse’s head and secure it to the buckle on the left side. Finally, adjust the fit of the halter as necessary and ensure that it is snug but not too tight.
What materials are horse halters made of?
Horse halters are typically made of nylon or leather. Nylon halters are more affordable, durable, and easy to clean, making them a popular choice for everyday use. Leather halters are more expensive, but they are softer and can be more comfortable for the horse. The choice of material depends on personal preference and the specific needs of the horse.
Can a horse wear a halter while turned out in the pasture?
It is generally not recommended to leave a horse wearing a halter while turned out in the pasture. There is a risk of the halter getting caught on objects, which can lead to injury. If it is necessary for the horse to wear a halter for identification purposes, it is advisable to use a breakaway or turnout-safe halter that is designed to release under pressure.
Conclusion
In conclusion, learning how to tie a horse halter is an essential skill for any horse owner or enthusiast. By following the step-by-step instructions provided in this guide, you can confidently and safely secure a halter on your horse. Remember to always approach your horse with care, patience, and a calm demeanor.
Tying a horse halter not only ensures the safety of your horse but also allows for easy handling, leading, and grooming. Practice tying the halter knots regularly to become proficient and comfortable with the process. With time and practice, you will become an expert in tying a horse halter, making it a seamless part of your horse care routine.
So, take the time to master this skill, and enjoy the rewarding experience of bonding with your horse while ensuring their well-being and safety.