
Learning how to tie a horse halter is essential for any horse owner or enthusiast. Whether you’re preparing for a ride or just need to secure your horse safely, knowing the proper techniques can make all the difference. In this guide, we’ll walk you through the step-by-step process of tying a horse halter, ensuring maximum security and comfort for your equine companion. From choosing the right type of halter to mastering the various knots, this introduction will equip you with the necessary knowledge to handle this important task with confidence.
Different Types of Horse Halters: Explore the various halter styles and their uses
When it comes to horse handling and control, the halter plays a crucial role. A halter is a piece of equipment that is worn around a horse’s head and is used to guide, lead, and tie up the horse. However, not all halters are created equal. There are different types of horse halters designed for specific purposes. In this section, we will explore the various halter styles and their specific uses.
1. Flat Halter
The flat halter is the most commonly used halter style and is suitable for everyday handling, grooming, and turnout. It is made of sturdy nylon or leather straps that go around the horse’s head and neck. The flat halter features a buckle closure or a snap hook, making it easy to put on and take off. It provides a simple and reliable way to control and lead the horse.
2. Rope Halter
A rope halter is made of soft but durable rope material, such as nylon or polypropylene. It is designed to provide more precise control and communication with the horse. The knots on the rope halter apply pressure points on the horse’s head, allowing for gentle cues and corrections. Rope halters are commonly used in natural horsemanship training and groundwork exercises.
3. Breakaway Halter
A breakaway halter is specifically designed with safety in mind. It features a breakable mechanism that allows the halter to release and break under pressure. This type of halter is particularly useful for horses that tend to panic or get caught in hazardous situations. The breakaway feature helps prevent serious injuries by allowing the horse to free itself if it becomes entangled or caught on an object.
4. Leather Halter
A leather halter exudes a classic and timeless look. It is made of high-quality leather material, which is not only durable but also soft and comfortable for the horse. Leather halters are often used for showing purposes or when a more elegant and sophisticated appearance is desired. However, they require regular cleaning and maintenance to keep the leather in good condition.
5. Padded Halter
Padded halters provide extra comfort and protection for the horse’s sensitive areas, such as the nose and poll. They feature padding made of soft materials like fleece or neoprene, which helps prevent rubbing and chafing. Padded halters are commonly used for horses with sensitive skin or those that require extra cushioning due to medical conditions or injuries.
6. Arabian Halter
The Arabian halter is specifically designed to fit the unique head shape of Arabian horses. It features a narrower noseband and a higher set browband to accommodate the distinctive facial structure of Arabians. Arabian halters are often embellished with decorative accents, making them popular for showing and displaying the breed’s elegant features.
7. Racing Halter
Racing halters are lightweight and streamlined to minimize any drag or interference during high-speed racing. They are typically made of synthetic materials, such as nylon or biothane, to ensure durability and easy maintenance. Racing halters are designed to provide minimal resistance and maximum comfort for the horse, allowing them to perform at their best on the track.
8. Foal Halter
A foal halter is specifically designed to fit the smaller head size of young horses. It features adjustable straps to accommodate the growing foal and ensure a snug but comfortable fit. Foal halters are lightweight and made of durable materials to withstand playful antics and ensure the safety of the young horse during handling and training.
9. Cross-Tie Halter
A cross-tie halter is specially designed for use with cross-ties or tie stalls. It typically features additional rings or attachments on the sides of the halter, allowing for easy attachment to cross-ties or tie rings. Cross-tie halters provide stability and security for the horse when tied in a cross-tie setup, preventing excessive pulling or leaning.
10. Fly Mask Halter Combo
A fly mask halter combo combines the functionality of a halter and a fly mask into one convenient piece of equipment. It features a built-in fly mask that provides protection against flies, insects, and harmful UV rays. This type of halter is particularly useful during turnout or when the horse is in the pasture, as it helps keep the horse comfortable and protected from irritating pests.
In summary, there are various types of

Step-by-Step Guide: How to Properly Tie a Horse Halter
Tying a horse halter may seem like a simple task, but it is important to do it correctly to ensure the safety and comfort of your horse. In this step-by-step guide, we will walk you through the process of tying a horse halter in a safe and effective manner.
Step 1: Gather the Necessary Equipment
Before you start, make sure you have all the necessary equipment. You will need a horse halter, a lead rope, and a secure tying point such as a hitching post or a sturdy fence.
Step 2: Approach the Horse Calmly
Approach your horse calmly and confidently. Speak to the horse in a soothing tone and allow it to become familiar with your presence before attempting to tie the halter.
Step 3: Position the Halter
Hold the halter in your hands and position it in front of the horse’s muzzle. Gently slide the noseband over the horse’s nose and ensure that it sits comfortably and snugly. The cheek pieces of the halter should rest on either side of the horse’s head, just below the ears.
Step 4: Secure the Buckle
Once the halter is properly positioned, secure the buckle or fastening mechanism. Make sure it is tight enough to keep the halter in place, but not so tight that it causes discomfort or restricts the horse’s breathing.
Step 5: Attach the Lead Rope
Take the lead rope and attach it to the metal ring or hook on the side of the halter. Ensure that the attachment is secure and that there is no risk of it becoming undone while the horse is tied.
Step 6: Choose a Secure Tying Point
Find a secure tying point, such as a hitching post or a sturdy fence. The tying point should be at a height that allows the horse to stand comfortably without being able to get its hooves tangled in the lead rope.
Step 7: Tie the Horse
Stand on the left side of the horse and hold the lead rope in your left hand. Take the loose end of the lead rope and pass it around the tying point. Create a loop by passing the loose end through the loop formed. Pull the loop tight, ensuring that it is snug but not overly tight.
Step 8: Ensure Safety and Comfort
Before leaving the horse tied, double-check that the halter is secure and that the horse is comfortable. Make sure there is enough slack in the lead rope to allow the horse to move its head freely, but not so much that it can step over or get tangled in the rope.
Step 9: Supervise and Monitor
Always supervise a tied horse and periodically check on its welfare. Ensure that the horse is not showing signs of distress or discomfort, and adjust the halter or lead rope if necessary.
Step 10: Untie the Horse with Caution
When it is time to untie the horse, do so with caution. Loosen the knot carefully and ensure that the horse is calm and relaxed before removing the halter.
In summary, tying a horse halter is a simple yet important skill for any horse owner or handler. By following this step-by-step guide, you can ensure that the halter is properly positioned and secure, providing your horse with the necessary comfort and safety. Remember to always prioritize the well-being of your horse and supervise them while tied.
Tips for a Secure Halter: Expert advice on ensuring the halter stays in place
A halter is an essential piece of horse equipment that is used for leading, tying, and grooming horses. It is important to ensure that the halter stays in place securely to prevent accidents or injuries. Here are some expert tips on how to keep your horse’s halter secure:
1. Proper Sizing and Adjustment
The first step in ensuring a secure halter is to choose the right size for your horse. A halter that is too loose can easily slip off, while a halter that is too tight can cause discomfort or even injury. Measure your horse’s head circumference to select the appropriate size, and make sure to adjust the halter straps to provide a snug fit without causing any pressure points.
2. Quality Material
Investing in a halter made from high-quality materials can make a significant difference in its security. Opt for halters made from strong, durable materials such as nylon or leather. These materials are less likely to break or stretch, providing better stability and security.
3. Double-Check the Buckles
Before using the halter, always double-check that the buckles are securely fastened. Loose or faulty buckles can easily come undone, putting your horse at risk. Ensure that each buckle is properly threaded through its respective hole and fastened tightly. Regularly inspect the buckles for signs of wear and tear, and replace them if necessary.
4. Proper Tie-Up Technique
When tying your horse using the halter, it is crucial to use the correct tie-up technique to ensure security. Avoid using a slip knot, as it can easily be undone by the horse. Instead, use a quick-release knot or a safety knot that will hold securely but can be easily untied in case of an emergency. Always ensure that there is enough slack in the lead rope to allow your horse to comfortably move its head, but not too much that it can get tangled or step over it.
5. Regular Inspections
To maintain a secure halter, it is essential to regularly inspect it for any signs of damage or wear. Check the stitching, buckles, and overall condition of the halter. Replace any worn-out or damaged parts immediately. Regular inspections will help identify potential issues before they become a safety hazard.
6. Keep a Spare Halter
Accidents can happen, and a halter can break unexpectedly. Always keep a spare halter handy in case you need to replace a damaged or broken one. This ensures that your horse is always properly secured, even in unforeseen situations.
7. Supervise Proper Usage
Ensure that anyone handling your horse is knowledgeable about the proper usage of a halter. Supervise and educate others on how to correctly put on and secure the halter. This will help prevent any mishaps or mistakes that could compromise the halter’s security.
By following these expert tips, you can ensure that your horse’s halter stays securely in place, providing safety and peace of mind during various activities involving your horse.
5. Halter Safety Measures: Important considerations for the safety and comfort of your horse
When it comes to handling and managing horses, one of the most essential pieces of equipment is a halter. A halter is a headstall that is placed on a horse’s head to provide control and facilitate handling. While halters are commonly used for leading, tying, and grooming horses, it is crucial to prioritize the safety and comfort of your horse when using a halter. In this section, we will discuss some important halter safety measures that every horse owner should be aware of.
1. Choosing the right halter size and material
The first step in ensuring the safety and comfort of your horse is to select the correct halter size. A properly fitting halter should be snug but not too tight, allowing enough room for the horse’s comfort and natural movements. It is recommended to measure your horse’s head circumference before purchasing a halter to ensure a proper fit.
Additionally, the material of the halter is equally important. Halters are commonly made of nylon, leather, or rope. Nylon halters are durable and easy to clean, while leather halters are known for their strength and classy appearance. Rope halters, on the other hand, offer more precise control and are commonly used for training purposes. Choose a halter material that best suits your horse’s needs and consider factors such as durability, ease of maintenance, and personal preference.
2. Inspecting the halter for wear and tear
Regularly inspecting the halter for any signs of wear and tear is crucial to prevent accidents and ensure your horse’s safety. Check for frayed straps, loose stitching, or damaged buckles that may compromise the halter’s integrity. If any damage is detected, immediately replace the halter with a new one to avoid any potential injuries to your horse.
3. Proper fitting and adjustment
Once you have selected the right size of halter, it is essential to ensure proper fitting and adjustment. The crownpiece should rest comfortably behind the horse’s ears, and the noseband should sit at least one to two inches below the cheekbones. Avoid fitting the halter too tightly, as it can cause discomfort, rubbing, and restrict the horse’s ability to breathe properly.
Regularly check the fit of the halter, especially in growing horses or those who may have gained or lost weight. Adjust the halter accordingly to maintain a proper fit and ensure your horse’s comfort.
4. Using breakaway or safety halters
In situations where your horse may be unsupervised or at risk of getting caught on objects, it is advisable to use breakaway or safety halters. Breakaway halters are designed to release or break under pressure to prevent the horse from injuring itself if it gets caught or tangled. These halters are particularly useful in turnout situations or when horses are tied in unfamiliar environments.
When using a breakaway halter, always ensure that the breakaway feature is in good working condition and regularly check the integrity of the breakaway mechanism.
5. Supervision and proper handling
Regardless of the type of halter you use, it is essential to supervise your horse while it is wearing a halter. Horses can be curious animals and may get themselves into dangerous situations if left unattended. Always handle your horse with care, using gentle and consistent pressure when leading or tying.
Ensure that anyone handling your horse is familiar with proper halter usage and understands the importance of safety measures. Educate yourself and others about the potential risks associated with mishandling or incorrect use of halters to prevent accidents and injuries.
In summary, halter safety measures are crucial for the overall well-being and comfort of your horse. By choosing the right halter size and material, inspecting for wear and tear, ensuring proper fitting and adjustment, using breakaway halters when necessary, and providing supervision and proper handling, you can minimize the risk of accidents and enhance the safety of your horse during handling and management.
FAQs
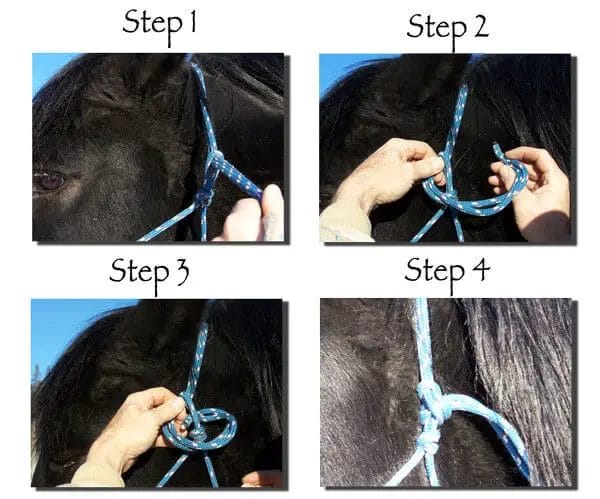
How to tie a horse halter?
To tie a horse halter, follow these steps: 1. Place the halter over the horse’s nose. 2. Bring the left strap over the horse’s head behind the ears. 3. Cross the right strap over the left strap. 4. Insert the free end of the right strap through the bottom loop. 5. Adjust the fit and tighten the straps as necessary.
Conclusion
In conclusion, learning how to tie a horse halter is an essential skill for any horse owner or handler. By following the proper steps and techniques, you can ensure the safety and comfort of your horse while handling them. Whether you are preparing for a ride, grooming, or simply leading your horse, a correctly tied halter will provide the necessary control and communication. Remember to always use a quality halter and secure it snugly but not too tight. Practice and repetition will help you become proficient in this important task, ultimately strengthening your bond with your equine companion.