
If you’re fascinated by the art of origami and want to create an impressive piece, look no further than a captivating origami snake. With just a few folds, you can transform a simple sheet of paper into a slithering masterpiece. Whether you’re a beginner or an experienced origami enthusiast, follow these step-by-step instructions to bring a unique and visually stunning origami snake to life.
Begin by selecting a square sheet of origami paper in the color of your choice. Make sure it’s sized appropriately for your desired snake size. If you don’t have origami paper, you can easily create a square by cutting a regular piece of paper into a square shape.
Start by folding the paper diagonally in half to form a triangle. Crease the fold well, and then unfold. Next, take the bottom corner of the triangle and fold it up towards the top corner, creating a smaller triangle. Ensure the edges align perfectly before creasing.
Now, fold the right and left corners of the triangle toward the top point, creating a diamond shape. Make sure the edges meet at the center and crease firmly. Unfold these folds to return to the triangle shape.
Take the top layer of the right corner and fold it inward along the crease line, while pushing the tip upwards. Repeat this step with the left corner, folding it inward. Flip the paper over and fold the bottom point up
Creative Variations of Origami Snakes
Origami, the art of paper folding, has been practiced for centuries and is loved by both children and adults alike. One of the most fascinating origami figures is the snake. With its sinuous form and intricate details, the origami snake is a favorite among enthusiasts. In this section, we will explore some creative variations of origami snakes that will surely impress and inspire.
1. Modular Origami Snake
The modular origami snake is a unique variation that involves folding multiple individual modules and then connecting them together to create a three-dimensional snake. Each module is folded separately and then assembled using interlocking tabs. This technique allows for greater flexibility in design and size, making it possible to create snakes of various lengths and patterns.
2. Geometric Origami Snake
The geometric origami snake takes inspiration from mathematical principles and uses precise folds to create intricate patterns and shapes. By folding the paper in specific angles and proportions, you can create a snake with a mesmerizing geometric design. This variation requires precision and patience but yields impressive results.
3. Wet-Folded Origami Snake
Wet folding is a technique that involves dampening the paper before folding it. This makes the paper more malleable and allows for smoother curves and organic shapes. By using the wet-fold technique, you can create a realistic-looking origami snake with lifelike scales and a more natural appearance. This variation adds a touch of realism to the traditional origami snake.
4. 3D Origami Snake
The 3D origami snake is a striking variation that uses multiple triangular units to create a dimensional figure. Each unit is folded using a simple triangular base, and several units are connected to form the body of the snake. This technique creates a unique texture and depth, resulting in a visually appealing origami snake.
5. Origami Snake with Artistic Embellishments
If you want to add a creative twist to your origami snake, consider incorporating artistic embellishments. You can use colored paper, markers, or even intricate cutouts to decorate the snake’s body and make it stand out. Additionally, you can create accessories like a crown or a top hat for your origami snake to give it a whimsical and personalized touch. Let your imagination run wild and transform your origami snake into a work of art!
6. Origami Snake with Accessories
Why stop at embellishments when you can take it a step further and create accessories for your origami snake? With a few additional folds, you can make a mini origami basket for your snake to hold or a tiny origami flower for it to coil around. These accessories add depth and character to your origami snake and make it a truly unique creation.
In summary, origami snakes offer endless possibilities for creativity and expression. Whether you prefer a modular design, a geometric pattern, or a more realistic approach, there is a variation of the origami snake that will suit your taste. By exploring different folding techniques and adding personal touches, you can bring these paper snakes to life and create stunning works of art.

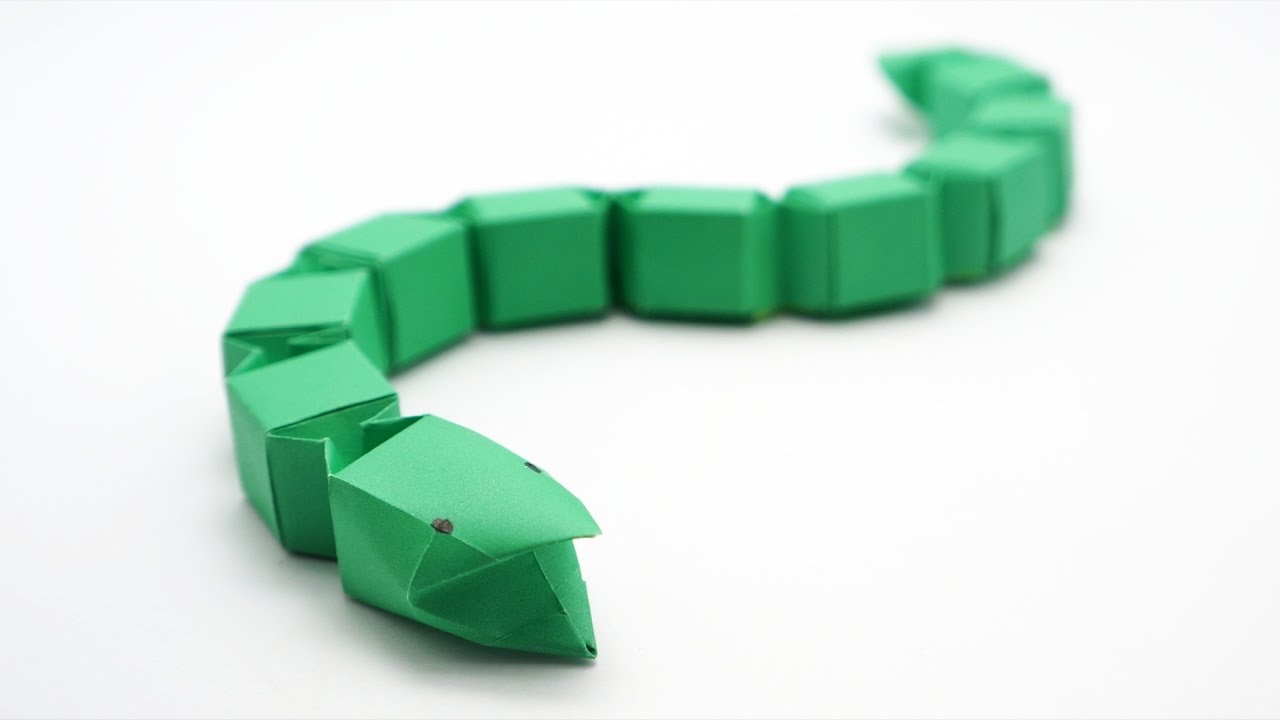
How to Make an Origami Snake for Beginners
Origami, the art of paper folding, is a popular pastime enjoyed by people of all ages. Creating various shapes and figures with a single sheet of paper can be both fun and rewarding. If you’re a beginner looking for an easy origami project, making an origami snake is a great way to start. In this section, we will guide you through the step-by-step process of creating an origami snake.Materials Needed
Before we begin, gather the following materials: 1. A square sheet of origami paper (preferably green or any color of your choice). 2. A flat surface to work on.Step 1: Start with a Square Sheet of Paper
To make an origami snake, you will need a square sheet of origami paper. If you don’t have origami paper, you can use any square paper, such as wrapping paper or colored construction paper. If the paper isn’t already a square, you can easily transform it into one by folding and trimming the excess.Step 2: Fold the Paper Diagonally
Take the square sheet of paper and fold it diagonally from one corner to the opposite corner, creating a triangle. Ensure that the edges align perfectly before creasing the fold.Step 3: Fold the Triangle in Half
Next, fold the triangle in half by bringing one corner to meet the other. This will form a smaller triangle.Step 4: Fold the Bottom Edges to the Top
With the folded triangle still intact, take the bottom edges and fold them up, aligning them with the top edge. This step will create a diamond shape.Step 5: Fold the Top Flaps
Now, fold the top flaps of the diamond shape downwards, creating a smaller diamond within the larger one. These flaps will eventually become the snake’s head and tail.Step 6: Fold the Bottom Tip Upwards
Fold the bottom tip of the small diamond shape upwards, aligning it with the top edge. This will form the body of the snake.Step 7: Create the Snake’s Head
To create the snake’s head, fold the top flap of the smaller diamond shape upwards. This will be the snake’s head.Step 8: Shape the Snake
To give your origami snake some dimension and shape, gently curve the body and head of the snake. You can use your fingers to create curves and bends to make it more lifelike.Step 9: Finishing Touches
Congratulations! You have successfully made an origami snake. Take a moment to adjust any folds or curves as desired. You can also draw eyes and a tongue on the snake’s head to add more detail and personality. In summary, making an origami snake is a simple and enjoyable project for beginners. With just a few folds, you can transform a square sheet of paper into a charming origami snake. Remember to take your time and have fun with the process. Happy folding!
Step-by-step instructions for folding an origami snake
Origami is the art of paper folding, and it has been enjoyed by people of all ages for centuries. In this section, we will provide you with step-by-step instructions on how to fold an origami snake. Follow these instructions carefully, and you will be able to create a beautiful snake out of a single sheet of paper.
Materials needed:
- A square sheet of paper
Instructions:
1. Start with a square sheet of paper. If your paper is rectangular, fold one corner over to the opposite edge to create a square, and then trim off the excess.
2. Fold the square in half diagonally to create a triangle. Make sure the edges align perfectly, and then crease the fold.
3. Unfold the triangle, and then fold it in half diagonally in the opposite direction. Again, make sure the edges align, and crease the fold.
4. Rotate the paper so that the open point is facing upwards. Take the right corner of the triangle and fold it towards the center, aligning it with the top point of the triangle. This will create a smaller triangle on top.
5. Repeat step 4 with the left corner, folding it towards the center and aligning it with the top point of the triangle.
6. Flip the paper over to the other side. Fold the bottom edge of the triangle up towards the top, leaving a small portion of the triangle visible at the bottom.
7. Take the right corner of the triangle and fold it upwards at an angle, creating a small flap. Repeat this step with the left corner.
8. Fold the small flap created in step 7 back down, tucking it underneath the larger triangle. This will form the head of the snake.
9. Fold the bottom edge of the paper up towards the top, creating another small flap. This will be the tail of the snake.
10. Hold the snake by its head and gently pull the tail, extending the body of the snake. You can adjust the shape of the body and head as desired.
11. Voila! You have successfully folded an origami snake. Now you can display it proudly or use it as a fun toy.
In summary, folding an origami snake is a creative and enjoyable activity that can be done by anyone. By following these step-by-step instructions, you can create your own origami snake in no time. Have fun and let your creativity soar!
Tips and Tricks for Perfecting Your Origami Snake
Origami, the art of paper folding, has been around for centuries and continues to captivate people with its intricacy and beauty. While there are countless origami designs to choose from, one of the most popular and visually striking options is the origami snake. Crafted from a single sheet of paper, the origami snake requires precision and patience to create. Here are some tips and tricks to help you perfect your origami snake.
Choose the Right Paper
When it comes to origami, the choice of paper plays a crucial role in the final result. For the origami snake, it’s best to use a thin yet sturdy paper that can hold its shape without tearing easily. Origami-specific paper, such as kami or washi, is highly recommended as they are specifically designed for origami projects. These papers come in a variety of colors, allowing you to customize your snake to your liking.
Follow Detailed Instructions
Creating an origami snake requires careful attention to detail. It’s important to find clear and detailed instructions that guide you through each step of the folding process. Look for diagrams or video tutorials that show the folding patterns and hand movements. Follow the instructions closely and take your time to ensure each fold is precise and accurate.
Practice with Simpler Models
If you’re new to origami or find the origami snake design particularly challenging, it can be helpful to practice with simpler models first. Start with basic shapes like the traditional origami crane or frog to familiarize yourself with the fundamental folds and techniques. As you gain confidence and dexterity, you can gradually move on to more complex designs like the origami snake.
Use a Bone Folder or Scoring Tool
To achieve crisp and clean folds in your origami snake, consider using a bone folder or scoring tool. These tools help to crease the paper neatly and aid in achieving sharper, more precise folds. A bone folder is typically made of smooth, polished bone or plastic, while a scoring tool has a pointed yet blunt edge that can be used to score the paper before folding.
Experiment with Different Sizes
The size of your origami snake can greatly impact its appearance. Feel free to experiment with different paper sizes to create snakes of varying lengths and thicknesses. Larger snakes can be more striking and detailed, while smaller ones can be delicate and intricate. Additionally, trying different paper colors can produce unique effects, allowing you to showcase your creativity.
Add Details and Personalization
Once you have mastered the basic origami snake, you can take your creations to the next level by adding details and personal touches. Use markers, colored pencils, or paints to draw scales, eyes, or patterns on the snake’s body. You can also attach googly eyes or small beads to bring your snake to life. Get creative and let your imagination run wild!
Practice and Patience
Perfection in origami, like any art form, requires practice and patience. Don’t be discouraged if your first attempts at the origami snake don’t turn out exactly as you envisioned. Keep practicing, refining your technique, and paying attention to the small details. With time, you’ll develop the skills necessary to create stunning origami snakes that will impress friends and family.
In summary, creating a perfect origami snake requires careful paper selection, following detailed instructions, practicing with simpler models, using helpful tools, experimenting with different sizes, adding personalization, and cultivating patience. By incorporating these tips and tricks into your origami practice, you’ll be well on your way to mastering the art of the origami snake.
FAQs
1. How can I make an origami snake?
To make an origami snake, start with a square sheet of paper. Follow a step-by-step tutorial or use a specific origami snake diagram. Generally, you will need to fold the paper diagonally, form triangular folds, and create accordion-like folds for the body. The final result should be a snake shape.
2. What type of paper should I use to make an origami snake?
It is best to use square paper that is thin and easy to fold. Origami paper or any lightweight paper such as printer paper or colored craft paper works well. Avoid using thick or stiff paper as it may be difficult to fold and shape.
3. Are there any beginner-friendly origami snake tutorials available?
Yes, there are several beginner-friendly origami snake tutorials available online. YouTube and origami websites like Origami-Instructions.com or Origami.me provide step-by-step instructions with diagrams or video demonstrations. These tutorials are designed to guide beginners through the process of creating an origami snake.
Conclusion:
In conclusion, learning how to make an origami snake can be a fun and rewarding experience. Whether you are a beginner or an experienced origami artist, this project offers a great opportunity to enhance your folding skills and create a captivating piece of art.
Origami snakes can be made using various techniques and designs, allowing you to unleash your creativity and customize the final result. The step-by-step instructions and video tutorials available online make it easier than ever to follow along and master this intricate fold.
Not only does making an origami snake provide a creative outlet, but it also promotes patience, concentration, and precision. So next time you’re looking for a unique and enjoyable craft project, give origami a try and make your own captivating snake!